Service and infrastructure monitoring with Uptime Kuma - Part 2
If you haven’t had the chance to go over part one, you can just click this link here.
Service and infrastructure monitoring with Uptime Kuma - Part 2
Service Type monitors
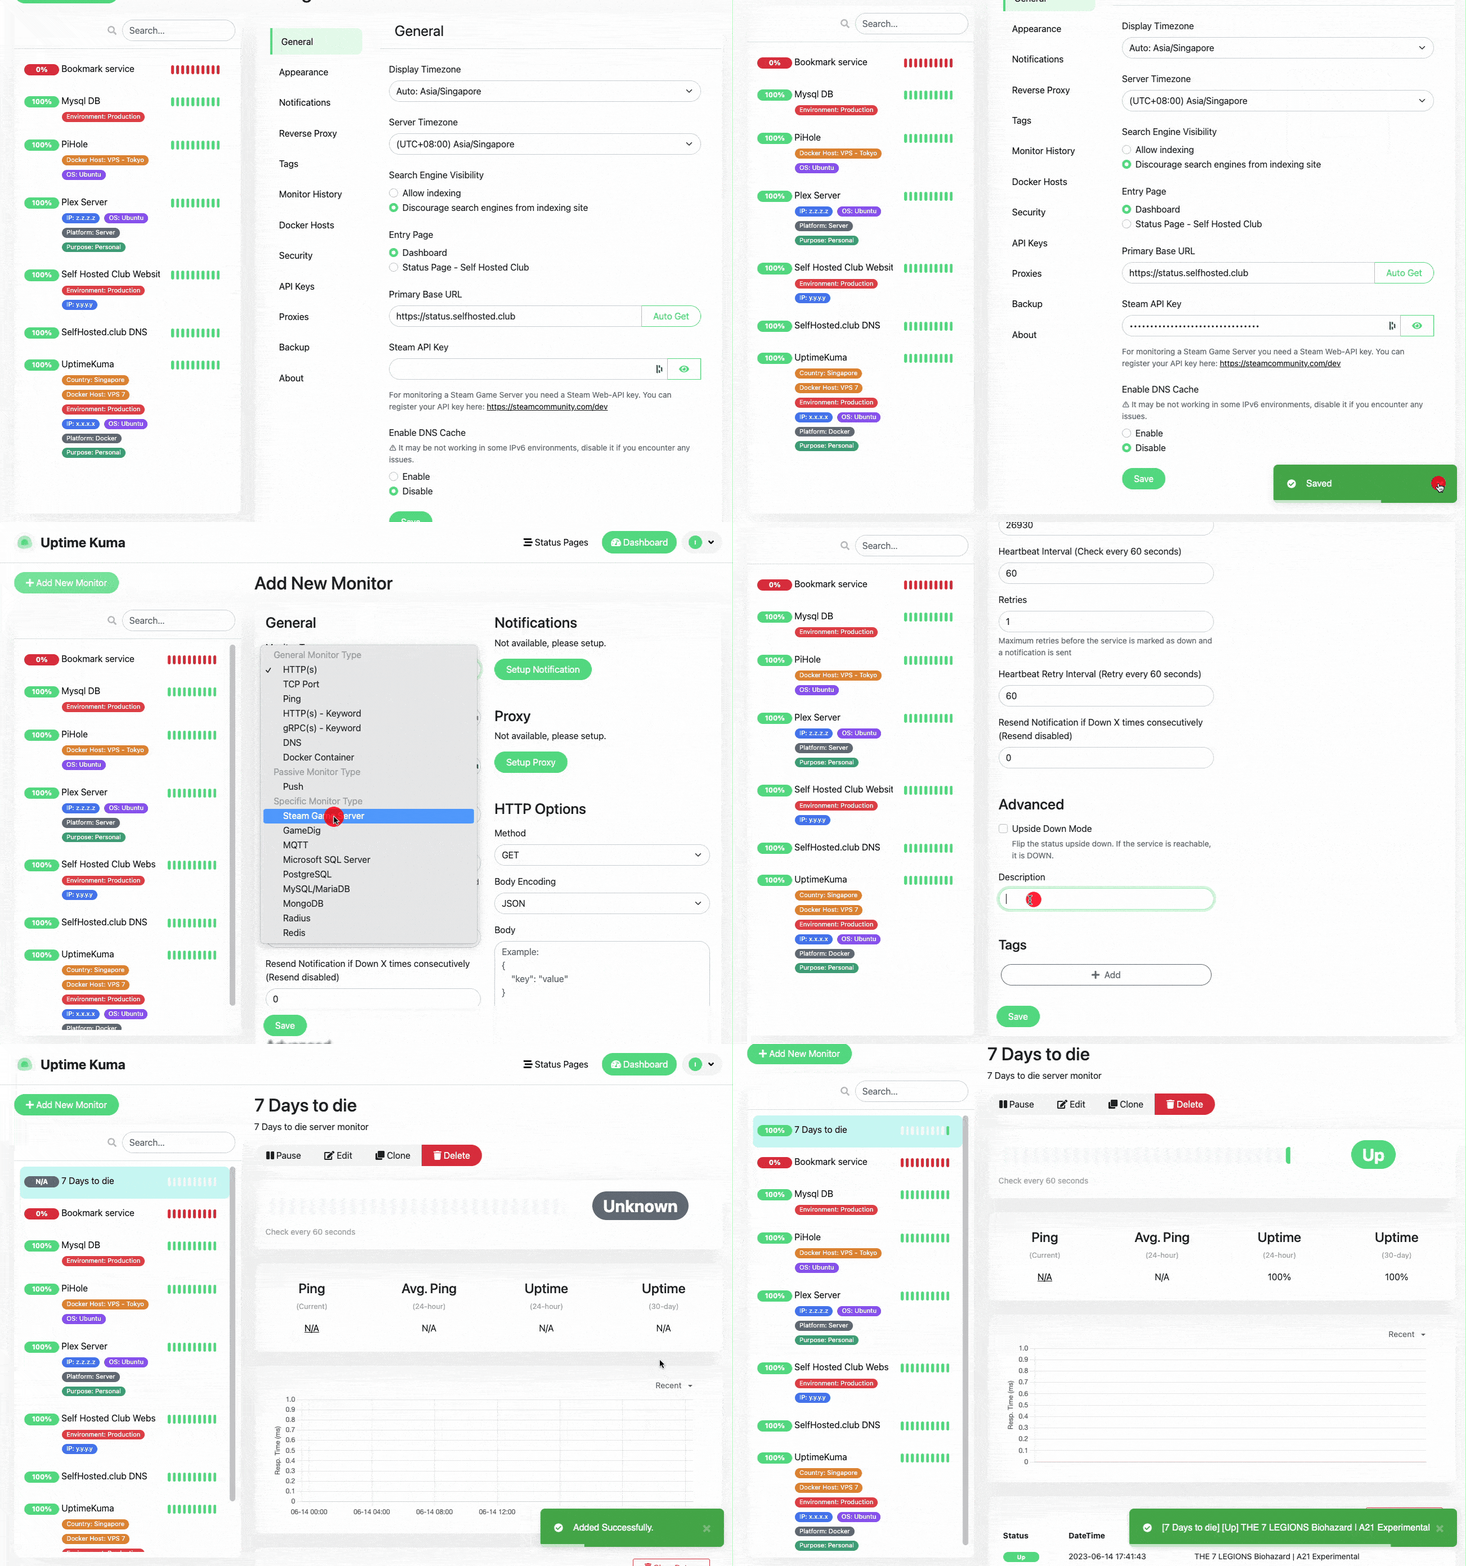
In the last part, we left out some of the specific service type monitors, we will go over those now. We will not going to show how to configure all these like we did in part one, as well… it is very specific to your requirement.
These are great monitors as they check that the service itself is running properly on top of the OS. As I’ve mentioned in the previous post, sometimes the OS hangs and responds to ping because the network stack is operational. The same can happen here, while you are getting pings and a login works, the database or the application itself may be hung or errored out.
Steam game server
First though, you will need to have a domain that you will be doing the calls from, if you want to set up a domain first and you have a cloudflare account just hop over to the “Built-In Cloudflare Tunnel” section; if you use a dynamic DNS, the configuration of a reverse proxy is out of scope for this document. We will cover common reverse proxies in future posts.
Some links may be affiliate links that keep this site running.
GameDig
GameDig is a game server query library. It’s used to query the status of hundreds of different types of game servers, including popular ones like Minecraft, Counter-Strike, and Ark: Survival Evolved, to name a few.
You can use GameDig to fetch information such as the current map, the number of players, the version of the game server, and much more. It works by sending a query packet to the game server, which then responds with the relevant status information.
GameDig is often used in gaming community websites or apps to display live server stats, or in backend systems to automate server management tasks.
Game servers can choose to disable query functionality, in which case GameDig or any other query tool would be unable to retrieve information from them.
You can check the list of games you can monitor at this link.
MQTT
MQTT, which stands for Message Queuing Telemetry Transport, is a lightweight messaging protocol that’s used for communication in Internet of Things (IoT) devices. It’s a publish-subscribe-based protocol, meaning that devices (clients) can subscribe to topics (channels) and receive updates from other devices that publish to those topics.
Uptime Kuma can perform TCP monitoring. Given MQTT uses TCP/IP to transfer data, you could use Uptime Kuma to monitor whether an MQTT broker (the server in an MQTT communication) is available and responding on its expected TCP port (usually 1883 for unencrypted communication and 8883 for encrypted). This will at least tell you whether the broker is up and reachable.
Microsfot SQL Server / PostgreSQL / Mysql / Mariadb / Mongo / Redis
These are all monitors for databases, they will connect to the database and execute a query that you ask for. This is how Uptime Kuma checks if the database is up. The important thing to note are the various connection string requirements.
MS SQL Server: Server=<hostname>,<port>;Database=<your database>;User Id=<your user id>;Password=<your password>;Encrypt=<true/false>;TrustServerCertificate=<Yes/No>;Connection Timeout=<int>
PostgreSQL: postgres://username:password@host:port/database
MySQL / MariaDB: mysql://username:password@host:port/database
MongoDB: mongodb://username:password@host:port/database
Redis: redis://username:password@host:port/database
Radius
RADIUS, which stands for Remote Authentication Dial-In User Service, is a networking protocol that provides centralized Authentication, Authorization, and Accounting (AAA) management for users who connect and use a network service.
If offers:
- Authentication: RADIUS checks who you are. It verifies your username and password before you’re allowed to use the service.
- Authorization: Once you’re authenticated, RADIUS decides what you can do based on the permissions associated with your account.
- Accounting: RADIUS keeps track of what you’re doing while you’re connected to the service. It’s typically used by Internet Service Providers (ISPs) to manage access to the internet or internal networks, VPNs, and wireless networks. So, if you’re logging into a VPN, the RADIUS server is what’s checking your username and password, deciding what network resources you can access, and then keeping track of your activity while you’re connected.
Setting up notifications
Uptime Kuma can notify you when a monitors’ status changes, these are quite self explanatory once you go into the configuration.
Some of the common ones you will find and most likely use.
- Webhook: This allows Uptime Kuma to send a HTTP/HTTPS request to a specific URL when a status change occurs. You can customize the request’s content and use it to trigger various actions, like creating a ticket in your issue tracking system.
- SMTP Email: Send an email alert using the Simple Mail Transfer Protocol (SMTP). You can customize the sender, recipient, and content of the email.
- Telegram: Send a message to a Telegram chat when a status change occurs. This requires setting up a bot on Telegram and providing its token to Uptime Kuma.
- Discord: Send a message to a Discord server. This involves creating a webhook on Discord and giving its URL to Uptime Kuma.
- Home Assistant: For the self hosted folks out there 😊.
- Slack: Send alerts to a Slack channel. Like with Discord, this requires creating a webhook on Slack and providing its URL.
- Pushover: Uptime Kuma supports Pushover, a service for sending real-time notifications to Android, iOS, and Desktop devices.
- Gotify: Gotify is a simple server for sending and receiving messages.
- Twilio (SMS): Send SMS notifications through Twilio.
- Signal: Send notifications via the Signal messaging application.
- Line: Send notifications through LINE.
Configurations differ between monitors, and as of the last count I had, there were 49 services you could send messages through.
You can define one or many notification services for each monitor, in case you have different teams you’d like to send a message to.
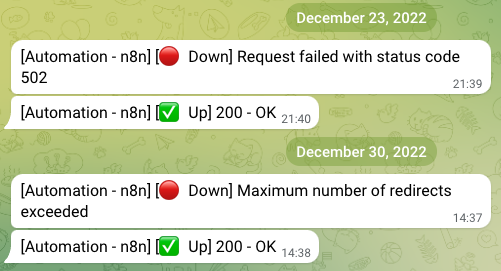
Here’s an example of how it looks in Telegram:
Reverse Proxies
In technical terms, a reverse proxy is a server that sits between client devices (like your computer or smartphone) and web servers, routing client requests to the appropriate server. The servers handle the request and the reverse proxy returns the server’s response to the client.
Think of a reverse proxy like the concierge of a grand hotel. Guests (or in our case, internet traffic) arrive, and the concierge directs them to the correct room (servers). The guests don’t see what’s going on behind the scenes; they just know they’re being taken care of!
A few things reverse proxies do exceptionally well:
- Load Balancing: If a website gets lots of traffic, a reverse proxy can distribute client requests across multiple servers to keep the site running smoothly.
- Caching: A reverse proxy can save (or cache) a server’s response to a request and use it to reply to similar requests, reducing the server’s load.
- SSL Encryption: Reverse proxies can handle encrypting and decrypting data sent over secure connections, offloading this task from the web servers.
- Protection: By obscuring the identities of backend servers, a reverse proxy provides an additional layer of defense against attacks.
If you are using reverse proxies, you can refer to the Uptime Kuma docs.
Built-in Cloudflare Tunnel
Cloudflare Tunnel is a service offered by Cloudflare that allows you to securely connect your infrastructure to the Cloudflare network. You might be familiar with Cloudflare’s primary services, which offer DDoS protection, speed optimization, and other security features to websites. However, Cloudflare Tunnel extends these benefits to any server or application, not just websites!
Here’s the gist of it:
Normally, when you want to connect a server or an application to the internet, you would have to expose it directly to the internet, leaving it vulnerable to attacks. This is where Cloudflare Tunnel comes in. Instead of exposing your server directly to the internet, you create a secure, outbound-only connection from your server to the Cloudflare network using a lightweight daemon called cloudflared.
cloudflared creates a persistent connection to Cloudflare’s edge servers using the industry-standard secure web protocol (HTTPS). Then, when users want to access your server or application, they don’t connect directly to it. Instead, they connect to the nearest Cloudflare data center, and their requests are securely relayed through the Tunnel to your server.
The server’s actual IP address remains hidden, which adds a great deal of security as it significantly reduces the server’s attack surface. Plus, because Cloudflare’s network is globally distributed, this setup can also lead to reduced latency and improved performance for users, no matter where they’re located!
So in simple terms, think of Cloudflare Tunnel as a safe, secret tunnel for your data. It’s a tunnel that starts at your server, travels through the internet using Cloudflare’s secure and fast network, and ends at your user’s device, providing them with a great and secure experience!
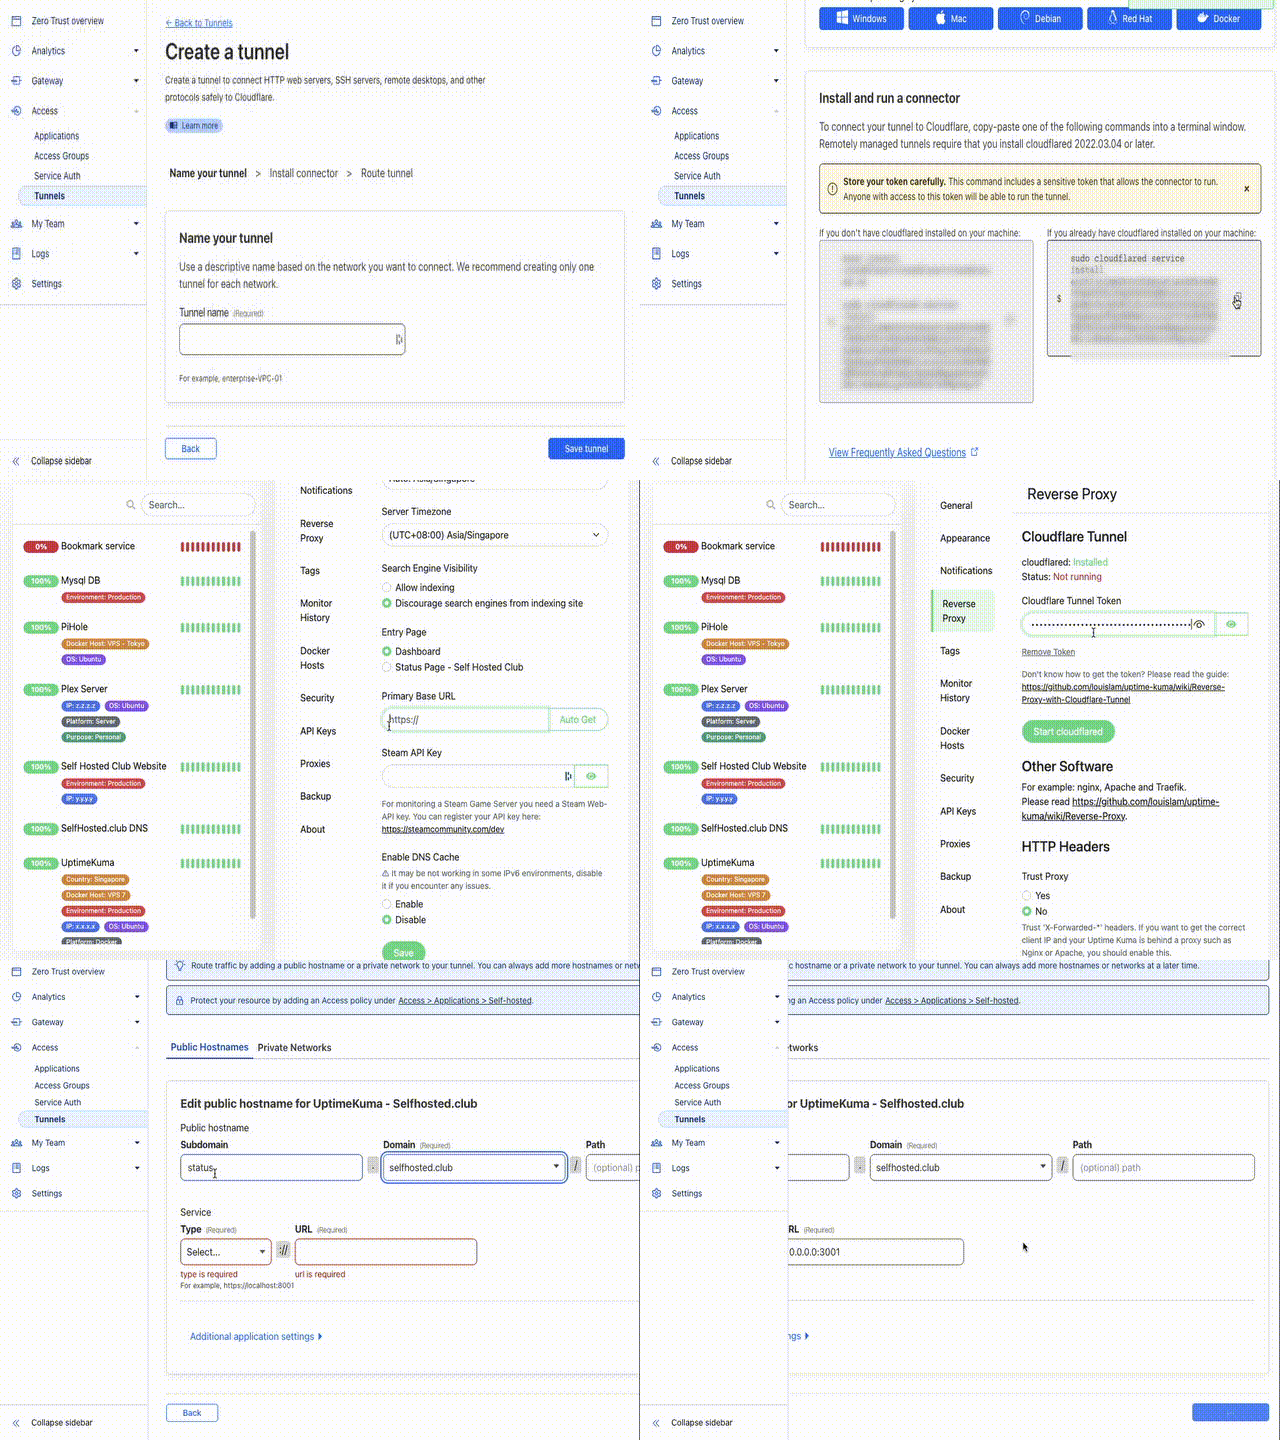
How do we configure one?
First you will need to have a cloudflare tunnel with a domain pointing to cloudflare servers, once you onboard the domain, head over to the Zero Trust Dashboard offered by cloudflare. Everything we are doing up to now is free and you won’t pay a dime above what you paid for the domain itself.
Other software & HTTP Headers
In many setups, especially in production environments, applications are often placed behind a reverse proxy like Nginx or Apache for various reasons, like load balancing, security, or SSL termination. When this happens, the application doesn’t directly receive client requests. Instead, the reverse proxy receives the requests and forwards them to the application.
Now, here comes the problem: since our application (in this case Uptime Kuma) is not directly dealing with client requests, it doesn’t have access to the client’s original IP address. Instead, it would see the reverse proxy’s IP address as the client IP. This can be problematic if when relying on certain features.
This is where X-Forwarded-* headers come into play. These are standard HTTP headers which are set by the reverse proxy to pass along some information about the original client request, like its IP address (X-Forwarded-For), the original protocol used (X-Forwarded-Proto), and the original host (X-Forwarded-Host).
When the “Trust X-Forwarded-* headers” setting is enabled, Uptime Kuma will trust these headers and use them to get the original client IP and other information, instead of using the IP of the reverse proxy.
It’s important to note that trusting X-Forwarded-* headers can pose a security risk if your application is accessible directly from the internet without going through a trusted reverse proxy, as a malicious client could set these headers to misleading values. So, generally, you should only enable this setting if you’re sure Uptime Kuma is properly secured behind a reverse proxy.
Stay tuned for our last part where we will explore the API.
Check out this link if you need to migrate your Uptime Kuma docker instance.


