Automating website deployment with Gitea and n8n
Learn how to automate deployment of websites using Gitea and n8n
It took me a while but I finally got to automating the deployment of this website with Gitea and n8n. The website itself is served across 6 servers around the world - something that I did because there were folks that had routing issues when the website was only hosted in Singapore.
You can imagine how time consuming it can be to update and maintain a website across these servers, let alone if you have dozens of them - and so I went out and created a set of scripts and a basic flow in n8n to automate the updates of this site. Now I know that some parts can be better such as automating Jekyll to build in Gitea, but I just prefer to do the build locally and then do the push for the website.
I assume that you already have everything under “What you’ll need” installed. There are lots of great guides on how to do it, but it’s also very straight forward.
All commands below have been tested and run on Ubuntu 24.04.
What you’ll need
-
Gitea or similar Gitea is a git server, I like it as it is simple and comes with what I need, which is really basic repository control for me. You could use GitHub, Forejgo and others - whatever works for you.
-
n8n n8n is not a must, and you could go with various ways to achieve automation - I will add a python script at the end for those that prefer to have a hook that triggers script execution.
-
A web server This might be obvious for some but you’ll need a webserver that serves files to the world to be able to utilise these automations… The specific scripts I write here are for nginx as that’s the one I feel comfortable with.
Optional
- Certwarden This is something that was missing in my setup for a while, and I was planning to write my own until I managed to somehow stumble across this project. Certwarden allows you to have a central certificate and key repository which can be queried by other clients and instances through a web request and retrieve the certificates back.
This has become quite an important part in my setup and I’ve created several scripts that you can now use to get certificates for different services such as proxmox and nginx.
- NetBird I make sure all SSH and requests are done over an overlay network.
Configuring scripts
Creating and configuring a deployment user
We want to do things securely, and so for that, we will proceed with creating a dedicated user that it’s only purpose is running these scripts.
1
2

# Creates a new user without a password
sudo adduser --disabled-password deployuser
You will be prompted to fill up the user’s information, you can just tap enter till the end.
Setting up SSH key based authentication
We need to switch into the deployuser now and set up the authentication keys so that we can login later.
1

sudo su - deployuser
Let’s now create the .ssh directory and set correct permissions:
1
2

mkdir ~/.ssh
chmod 700 ~/.ssh
You can choose to go in one of two ways here, if you already created and have keys that you want to reuse from somewhere the go to the importing keys section, otherwise you’ll need to create those.
Creating new keys
We will create ed25519 keys as those are much shorter and easier to work with than RSA keys. Make sure to replace
The command below will generate keys and will prompt you for a file name to save in:
1

ssh-keygen -t ed25519 -C "deployuser@<identifier>"
Once the keys are generated, lets insert those into the authorized_keys so that we can remotely login with it, make sure to replace the path to what you chose:
1

cat /home/deployuser/.ssh/id_ed25519.pub
Copy the output somewhere and note the command in the importing keys section below.
Importing keys
Instead of generating the keys over and over again everywhere, you will need to repeat the line below on every server you want to allow access to those keys after you create the deployuser. This is because we need to create the private key only once and can copy the public key into authorized_keys in other users.
1

echo "ssh-ed25519 AAAAC3NzaC1lZDI1NTE5AAAAIE... deployuser@yourdomain.com" | sudo tee -a /home/deployuser/.ssh/authorized_keys
If you have other servers that are already configured with the deploy user, you can run the ssh-copy-id from the server where you created the keys, you will need to have a password set up for this though:
1
2

ssh-copy-id -i /home/deployuser/.ssh/id_ed25519.pub deployuser@server1
ssh-copy-id -i /home/deployuser/.ssh/id_ed25519.pub deployuser@server2
After you’ve copied the keys, make sure to set the correct permissions and exit the deployuser shell:
1
2

chmod 600 ~/.ssh/authorized_keys
exit
Setting scripts for automatic pulling of repository
The script below fetches a specific directory from your gitea repo (sparse clone), in my case it’s “_sites” as that is where the Jekyll build resides, the script is well documented, so you can open the link and take a look yourself what’s in it.
Run the curl command from the folder where you’d like to save the scripts, for me, I always keep those in /scripts folder.
1
2
3
4
5

sudo mkdir /scripts
sudo chown $USER:$USER /scripts -R
cd /scripts
curl https://raw.githubusercontent.com/SelfHosted-Club/scripts/refs/heads/main/Automating%20website%20deployment%20with%20Gitea%20and%20n8n/update_sites.sh
nano update_sites.sh
The important variables you’ll need to set are:
- REPO_URL=”http://gitea/youruser/example.git” - The URL of the repo you are going to clone.
- TARGET_DIR=”/var/www/html/yourdomain” - nginx directory where it is going to reside
- BRANCH=”main” - Change if your default branch is different
- DEPLOY_USER=”www-data” - Assuming you’re using ‘www-data’; change if using a different user. This is for nginx
- LOG_FILE=”/var/log/update_sites.log” - Log file for script executions
Setting permissions for the deployment user
While running as a privileged user, let’s make that our scripts are executable:
1

sudo chmod +x /scripts/*.sh
Change the ownership to a secure setting that is accessible only by authorized users: Explanation of the command below:
-
rootowns the scripts. -
deployuseris in thedeployusergroup and can execute the scripts. - Permissions
750allow the owner to read/write/execute, the group to read/execute, and others no access. - Last command removes all permissions for users not in the owner or group.
1
2
3

sudo chown -R root:deployuser /scripts
sudo chmod -R 750 /scripts
sudo chmod -R o= /scripts
We now need to allow deployuser to be able to run the scripts and reload nginx.
1

sudo visudo
Paste the below, you can modify the apt-get or remove it if you have all your packages installed and updated already, deploy user for me also runs updates and upgrades.
The below does:
-
NOPASSWD: allows the specified commands to be run without entering a password. - Specifies full paths to commands for security.
1
2
3
4
5
6
7
8

# Allow deployuser to execute scripts in /scripts without a password
deployuser ALL=(ALL) NOPASSWD: /scripts/*.sh

# Allow deployuser to run apt-get update and apt-get upgrade without a password
deployuser ALL=(ALL) NOPASSWD: /usr/bin/apt-get update, /usr/bin/apt-get upgrade

# Allow deployuser to reload Nginx without a password
deployuser ALL=(ALL) NOPASSWD: /bin/systemctl reload nginx
Testing privileges
Let’s test that everything works fine:
1
2
3
4
5

sudo su - deployuser
sudo /scripts/update_sites.sh
sudo apt-get update
sudo apt-get upgrade
sudo systemctl reload nginx
If you have no errors, you can exit back to your user and continue.
Optional: Security best practices for permissions
It is recommended to lock down SSH as much as possible, and so you should verify that:
- System is updated:
1

sudo apt update && sudo apt upgrade -y
- SSH Access is limited
- Edit your
/etc/ssh/sshd_configand make sure that the following options are set as follows:1 2
PermitRootLogin no AllowUsers deployuser anyotheruser
- Edit your
It is important that you set anyotheruser to whatever user that you are using! If you are using
root, DO NOT set thePermitRootLogintonoas you will lock yourself.
Test your script
Finally, let’s test the script that it works with all the permissions we have set, you should be able to run it using the command below and have no errors returned.
1

sudo /scripts/update_sites.sh
Configuring n8n
n8n configuration is quite straight forward.
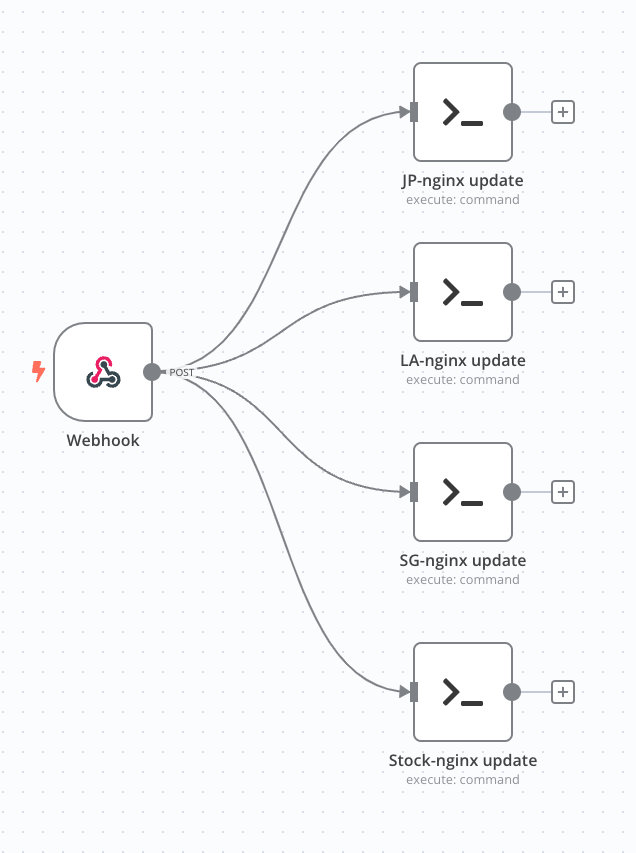
- We will first create a hook, make sure to read here how to close off your console access through the hook subdomain if you haven’t yet.
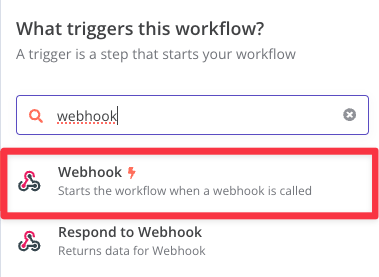
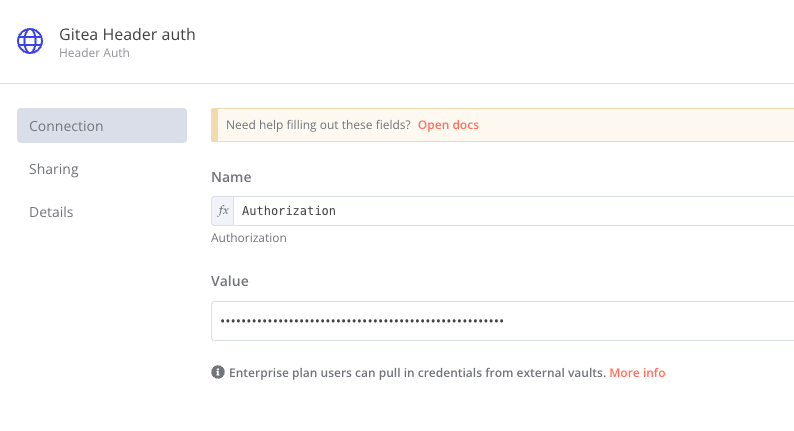
I recommend to also set authentication for your hook in the form of Header Authentication, see images below on how to set it up.
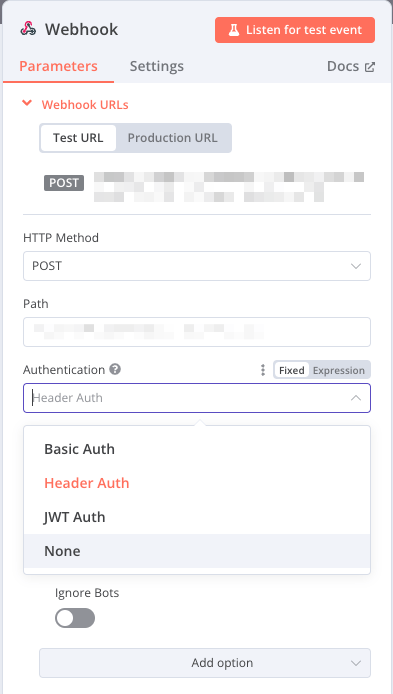
Make sure you set the Name as Authorization or you will not be able to execute the hook from Gitea.
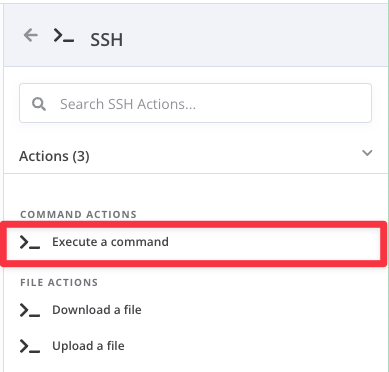
- Create a SSH Action
Add an action under the hook, and search for SSH, choose execute command.
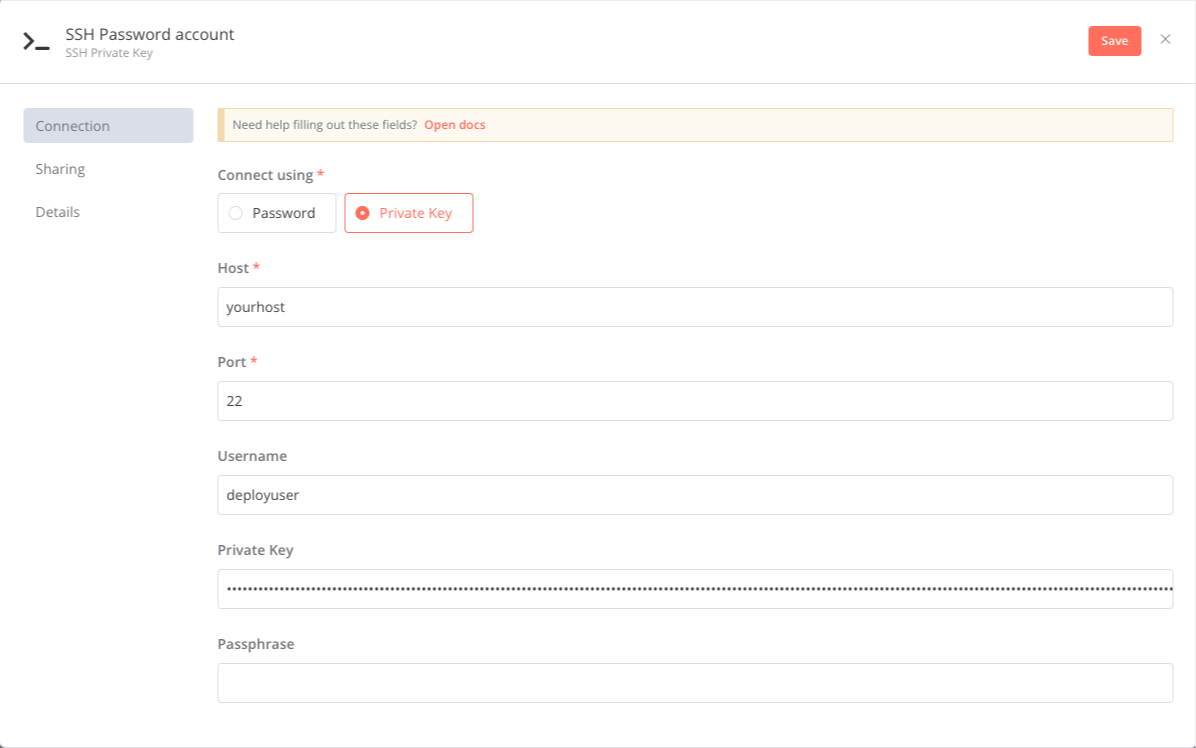
- Create a new credential
Create new credentials, and fill up the details.
For the Private Key option, you’’ need to retrieve the private key we created earlier and paste it in, including the -----BEGIN OPENSSH PRIVATE KEY----- and -----END OPENSSH PRIVATE KEY----- lines.
Run the command below to see your key
1

cat /home/deployuser/.ssh/id_ed25519
Create new credentials as below:
And after repeating previous steps you should have something like this:
Configuring Gitea
After you’ve set up everything, we only have the setup in Gitea, and this one is quite easy.
Go to your repository that you want to clone then Settings -> Webhooks
- In the
Target URL, copy the link from n8n to call your webhooks. - Set to whichever method you decided on earlier, I use post as I am sending information over to n8n.
- In
Trigger On:chooseCustom eventsand selectPush - In
Authorization Headerset the value that you configured in n8nHeader Auth Value. - Click on
Test Deliveryand see your webhook executed in n8n.
Final thoughts
Horray! You reached the end. There are lots of other things that can be done and improved here, and I will make sure to update and link back to this post any updates I might have.
Enjoy your automated site deployments!